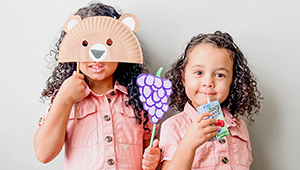
Hungry Forest Friends Craft


Ever wanted to make believe you’re a wild animal living in the forest? Or a monster from another planet? Us too! Our Hungry Forest Friends Craft is the perfect activity to take your little’s big imagination even further!
Supplies:
- Paper Plates
- Paper Straws
- Acrylic Paint and Brushes
- Googly Eyes
- Scissors (Adults Assistance)
- Glue Stick
- Pencil

STEP 1:
Lions and tigers and bears, oh my! What forest friend would your little one like to be? Here we show you how to create a bear, a deer, and a monster – but feel free to make any other creature you have in mind!
Once you’ve decided on which forest friend you’re going to make, grab a few paper plates and a pair of scissors. To make the face, go ahead and cut one paper plate in half. Next, poke holes into the plate for the eyes. Using a spare paper plate, cut out ears, a mouth, a nose and any other characteristics you’d like to add!

STEP 2:
And now, to add some color! Let your kids decide what colors they’d like to use and encourage them to talk about what their forest friend or other creature looks like in their imagination. The mask will be worn with the bottom of the plate as the front of the face so make sure any designs are done there! Once you’re done painting, set aside to dry.
After the paint has dried, use your glue stick to attach the various features to each forest friend. For example: for the bear and the deer, go ahead and attach their ears to the top of their head, and for the monster, attach its teeth to the bottom! Glue on any additional features like the nose of the bear or googly eyes across the monster’s face.
Lastly, we’re going to glue a paper straw to the back of one side of the paper plate. This will be used to hold the mask up to your face.


STEP 3:
Do you hear that? Our forest friends tummy’s are rumbling! We’re going to have to make them some food.
On the inside of a paper plate draw out the fruit or vegetable (or any other food) you think your forest friend would want to eat! Here we’ve drawn a bunch of grapes for our bear, an apple core for our deer, and of course – a pineapple for our monster!
After you’ve drawn out the food of your choice, go ahead and cut it out from the plate.


STEP 4:
Colorful foods are the best kind so let’s get our paints ready again! Decide which colors to use for each of your foods. This is a fun way to let your kids show off their knowledge by asking them things like – “What color do we need for grapes?” Once they’ve answered you can encourage them with words like – “Purple, that’s right! These are purple grapes for our bear!”
Once the paint has dried, go ahead and use your glue stick to attach any missing parts to your foods – for example: the stem and leaf on the apple. Then glue a straw to the back of the plate with a handle extending from the bottom.

STEP 5:
That’s it you’re done! Don’t forget your forest friends will need to be hydrated, so grab a Juicy Juice break between playtime!


