


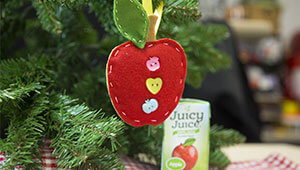
Juicy Apple Felt Tree Ornament

Nothing is quite as special as homemade tree ornaments. We believe that the best decorations are ones that families can create together, so we worked on a Juicy Felt Tree Ornament for you and your family to enjoy during the holidays. To see our steps, check out the video we created here.
You Will Need:
3 buttons (or beads)
1 piece of ribbon
1 piece of red felt
1 small piece of brown felt
1 piece of light green felt (or any color you desire for the backing of your apple)
1 piece of green felt
Filler felt of any color (we chose white)
Scissors
Glue
Thick thread (we chose white)
Medium sewing needle
Step One:
Gather your materials.
Light green felt: Cut this into a silhouette of an apple, including a stem.
Red felt: This makes the front of the apple; you can trace this against the light green felt once you have finished cutting that out.
Brown felt: This makes the stem; cut two pieces with the shape of the light green felt as a guide.
Green felt: Cut the green felt into two leaf shapes that match. You can use one leaf as a guide for the other.
Filler fabric: We cut our fabric so our apple has a gentle rise in the middle. Using the light green outline as a guide, we cut smaller pieces that stacked on each other to give the apple dimension. Each layer is smaller than the layer underneath it. Please watch our video for a visual.
Step Two:
Cut your felt pieces into the different shapes needed to assemble your apple. Layer your filler pieces of felt onto the backing of your apple. If you want, you can glue these layers together.
Step Three:
Place the red felt cut out on top of the filler felt and light green felt backing so the filler felt is in between the red and light green layers. Make sure the red felt front and light green felt backing line up along the edges. Additionally, you should not be able to see any filler felt peeking underneath. Once you have completed this step and trimmed accordingly, you can glue the edges down to keep sewing easy.
Step Four:
Glue the brown stem pieces to both the front and back of the stem part of the light green backing of your apple.
Step Five:
Stitch along the edges of the body of your apple. The stitches can be far apart. You might want to do this step if your little ones are not able to do this on their own.
Step Six:
Now that you’ve stitched up the apple, stitch your leaves together along the edges. Once you have finished stitching the two leaf pieces together, you are ready to sew your leaf onto your apple. A couple of stitches on the corner of the leaf should hold the apple and leaf together.
Step Seven:
Next, sew your buttons up the front of the ornament. We sewed ours like the buttons on a gingerbread man!
Step Eight:
Loop the ribbon and glue or sew both ends to the back of the apple. Once you let the glue dry, your ornament is ready to decorate your tree! At Juicy Juice, we hope you and your family have a cheerful holiday season full of love and smiles. If you create an ornament together, please share pictures with us on social media!