

Share

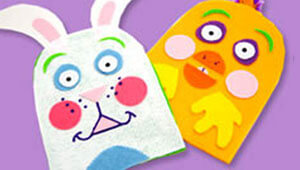
No-Sew Easter Puppets: Easy Kid-friendly Craft

What you need:
- Scissors
- 9 x 12 sheet of stiff felt in green (for leaf and pin base)
- Craft glue
- Ballpoint pen
- 1 tube of 3D craft paint (purple or your choice)
- Pot holder
- 1 large plastic Juicy Juice® bottle cap
- 1 water bottle cap
- Pinking shears (optional)
- Hole punch (optional)
- Felt to make the bunny (1 stiff piece of white felt, 3 regular pieces of white felt, 1 piece each of dark pink, light pink, blue, green and black felt)
- Felt needed to make the chick (2 pieces of golden yellow, 1 piece of orange, light yellow, pink, purple, green and black. You will also need two extra pieces for colorful feathers)
How to do it:
Follow the directions below to make a bunny or a chick.
Bunny:
- To create the body of the bunny, use a pot holder as a guide. If you do not have a pot holder, you can draw rounded corners on the top of your felt sheet and cut out the shape. Put the front and back together and cut them out at the same time. Set them aside.
- Next, draw two ears on a stiff piece of felt, and cut them out. Use your craft glue to sandwich the ears between the front and back “body” pieces. Glue the front and back of the body together, be sure to glue only the sides and top-do not glue the bottom of the puppet shut.
- Create the inside of the ears by drawing two shapes on your pink felt to fit within the bunny ears. Use your craft glue to attach them.
- Using the large and small plastic bottle caps, trace out two large circles in blue and two smaller circles in white for the eyes. Cut them out and use glue to attach.
- For the center of the eyes, use a hole punch to make two little black circles or use a dot of 3D paint. To create eyebrows, use scraps or draw them with paint. The optional pinking shears can make nice edges for eyes and eyebrows.
- To make the nose and mouth, draw two small triangles out of felt, cut them out and attach. Next, make the cheeks by tracing two circles with the large juice bottle cap on pink felt. Cut them out and attach.
- Finishing details on the bunny can include a half circle at the bottom of the puppet for a chest and using paint to draw a smile and whisker marks on the face of the bunny.
Chick:
- To create the body of the chick, use a potholder as a guide. If you do not have a pot holder, you can draw rounded corners on the top of your 2 yellow felt sheets and cut out the shape. Put the front and back together and cut them out at the same time. Set them aside.
- Glue two colorful feathers in between the front and back “body” pieces at the top before decorating the face.
- Follow the same instructions to do the eyes and cheeks as the bunny puppet.
- To make the beak, trace a circle with the large juice bottle cap on the orange felt, and cut it in half. Glue the two halves in a position you like for the beak and add a scrap of pink for the tongue.
- To complete the chick, draw two “wiggly shapes” (like a hand with 3 fingers) and attach for wings on the back. You can then use some 3D paint for a stripe on the tongue and a nose hole on the beak.
- Allow the glue and any paint on your completed puppet to dry before use.
Follow up fun: Have a show!
You will need:
- Completed puppet
- Clothespins
- A sheet or blanket
Drape a sheet or blanket over two kitchen chairs and secure with clothespins to build an easy stage. Use your imaginations to hold a puppet show and entertain the whole family.